MENS PERIOD SHIRT

1.) Unfortunately I forgot to take photos at each step of the making of my mens period shirt so the photos may skip a lot! However, I first began cutting out the shirt shapes in accordance to the measurements above and my models measurements.

1.) I chose a cream cotton lining which has a nice sheen to it and was inexpensive. Here you can see the pieces cut out and overlocked. I then added gussets at the neck seam and gathered it in. I then made the collar (made it exaggeratedly tall which was typical in the 1980s) and sewed it to the gathered neck lime.

2.) Here is a close up of the neck gusset attached at the shoulder seam.

3.) This is the inside of the collar attached to the gathered neck seam. I then hand sewed the inside of the collar to the neck line.

4.) I then hand sewed the inside of the collar to the inside of the shirt. You can easily do this by machine ad stitch in the ditch (which is quicker) but I think it looks much neater by hand.

5.) I then sewed the underarm gussets to the sleeve, keeping them as squares and not folding them in half. I then sewed the sleeve seam, leaving 4" open at the bottom for the wrist to fit through.

6.) This is the sleeve and underarm gusset right way round before getting attached to the shirt. (Upside down!)

6.) I then gathered the head of the sleeve and the bottom of the sleeve. I attached the sleeve to the body of the shirt and attached the cuff to the bottom of the sleeve.

7.) I then hand sewed the inside of the cuff to the inside of the sleeve. Again, this can be done by machine with stitch in the ditch technique, but I think that doing it by hand is neater.

8.) I should have sewn the ribbon in when I was sewing the cuff together, but I forgot! So I unpicked the edge of the cuff, placed the ribbon in and hand sewed it back together.

9.) Cuff complete! (I chose a polka-dot ribbon as my costume is a mixture of eras). Cotton tape can be used here of other ribbon.

10.) On one side of the shirt opening, I have made a frill and attached it to the shirt. To do this I just folded a strip of fabric in half, on the bias and gathered at one side, then sewed it to the opening at the chest. Once I have added the other side, I will add bias binding along the opening to cover the raw edge.

11.) Once I added the frill, I then cut some bias binding in the same fabric as the rest of the shirt. To do this I cut a strip the same length as the shirt opening, plus 1" for seam allowance. This is cut on the bias.

12.) I then stitched the bias binding to the raw edge of the opening. Right sides together.

13.) I then trimmed the fabric down as the gathers of the ruff add a lot of un-needed bulk.

14.) I sewed the edge of the bias binding down and began to pin along the edge. Again, I could have machine stitched but felt hand sewing was much neater.

15.) Using an invisible stitch, I hand sewed along the bias binding on the inside of the shirt.

16.) Finished the bias binding! I will be adding a button but want to check for positionings in my next fitting.

17.) I then sewed the sides together and hemmed the bottom of my shirt (Keeping the back slightly longer than the front).
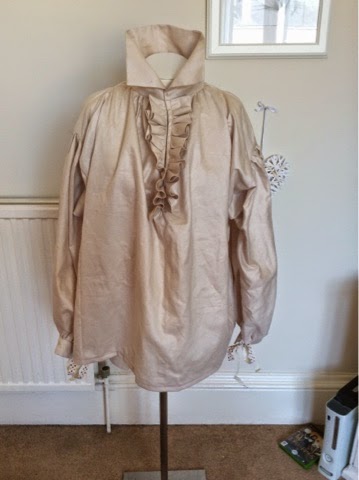
18.) Although my mannequin is far too small for this shirt, here is the finished garment!

19.) Back view
No comments:
Post a Comment